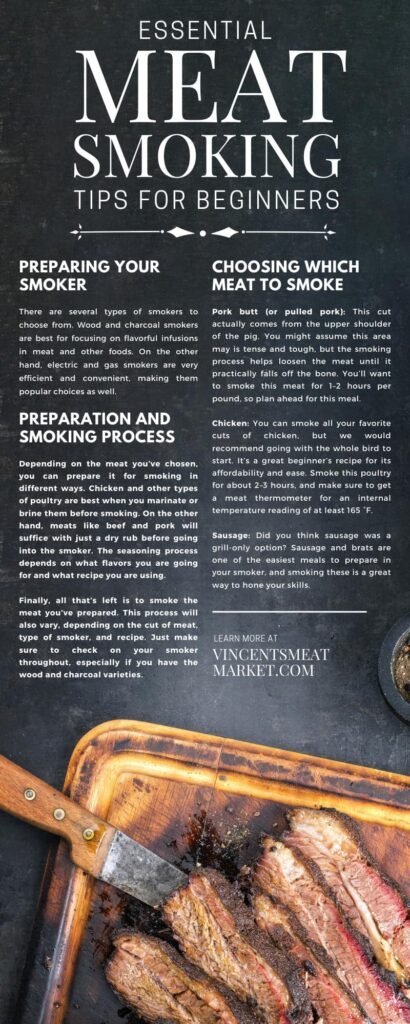
Have you ever wondered why smoked meat has this unparalleled depth of flavor that leaves our taste buds yearning for more? Smoking meat isn’t just a way of cooking; it’s an art form that combines tradition, patience, and a fair bit of science to create something truly special. Let’s face it, who wouldn’t want to master this craft? In this guide, we aim to demystify the process, provide you with essential tips, and ease you into the fine art of smoking meat. Buckle up and get ready to transform your backyard cookouts from mundane to mouthwatering.

This image is property of cdn-keold.nitrocdn.com.
What Exactly is Smoking Meat?
Alright, let’s get this straight: what does smoking meat even mean? Simply put, smoking meat involves cooking it slowly over a source of smoke. The process not only cooks the meat but also infuses it with rich, smoky flavors that are hard to achieve through any other cooking method. We’re not just talking about throwing some wood chips on a fire and calling it a day. No, smoking meat is a careful, deliberate process that requires time and attention.
Types of Smoking
There are two main types of smoking methods: hot smoking and cold smoking. Each has its own set of rules and results in different textures and flavors.
| Smoking Method | Temperature Range | Uses |
|---|---|---|
| Hot Smoking | 165°F to 250°F | Cooking and flavoring meat, fish, poultry |
| Cold Smoking | 68°F to 86°F | Flavoring without cooking |
-
Hot Smoking: This is the more commonly used method and is likely what you’re going to start with. In hot smoking, we cook the meat and infuse it with flavor simultaneously. It’s ideal for items like ribs, brisket, and poultry.
-
Cold Smoking: This method is more about flavoring than cooking. Think of it as the smoky seasoning process. Foods like cheese, fish, and even nuts can be cold-smoked. Because it doesn’t cook the food, it’s essential to use cold smoking on already cured meats to avoid health risks.
So, which one should you start with? If you’re a newbie, hot smoking is your best bet. It’s straightforward and perfect for producing those tender, juicy meats we all adore.
Essential Equipment for Smoking Meat
Before we dive into the nitty-gritty details of smoking meat, let’s first talk gear. You don’t need a high-end setup to start; a basic smoker will do just fine. But knowing what equipment is essential can save us from a lot of frustration.
Types of Smokers
| Smoker Type | Fuel Source | Pros | Cons |
|---|---|---|---|
| Charcoal Smoker | Charcoal | Authentic smoky flavor, more manual control | Requires constant monitoring, learning curve |
| Electric Smoker | Electricity | Easy to use, consistent temperature | Lacks deep smoky flavor, dependent on power |
| Propane Smoker | Propane/Gas | Quick heat-up, easy temperature control | Can be expensive to run, less smoke flavor |
| Pellet Smoker | Wood Pellets | Great flavor, easy temperature control | More expensive, requires electricity |
| Offset Smoker | Wood/Charcoal | Traditional method, excellent flavor control | Large, needs frequent tending, learning curve |
-
Charcoal Smokers: These are the go-to for purists. They provide an authentic smoky flavor and give us control over the heat. If you’re up for a bit of a challenge, this could be an excellent starting point. Just be prepared for a steeper learning curve.
-
Electric Smokers: User-friendly and efficient, these smokers are perfect for beginners who don’t want to handle charcoal or wood directly. While they might not produce the same depth of flavor as charcoal smokers, their ease of use and consistency make them a popular choice.
-
Propane Smokers: These offer the convenience of electric smokers but with slightly better flavor, thanks to the gas flames. They heat up quickly and are easy to control, making them another solid choice for beginners.
-
Pellet Smokers: These are sort of the “best of both worlds” option. Using wood pellets, they offer great flavor and easy temperature control. However, they do come with a higher price tag.
-
Offset Smokers: These are for the serious BBQ enthusiasts among us. They use wood or charcoal and separate the firebox from the cooking chamber. While they can produce some of the best-flavored smoke, they require a lot of attention and skill to master.
Additional Tools
Alright, so we’ve got the smoker. What’s next? Just like any good craftsman, we need our tools of the trade:
- Thermometers: A dual probe thermometer, one for the meat and one for the cooking chamber, is essential. Smoking meat is all about maintaining the correct temperature.
- Water Pan: Placing a water pan inside the smoker helps maintain moisture and regulate temperature.
- Wood Chips/Chunks/Pellets: Depending on your smoker, you’ll need a steady supply of wood. Different woods impart different flavors, which we’ll get into later.
- Drip Pan: To catch those savory drippings and make cleanup easier.
- Chimney Starter: Particularly useful for charcoal smokers, a chimney starter helps you light the coals quickly and evenly.
Choosing the Right Wood
Here’s where things start to get exciting. The type of wood we use can dramatically influence the flavor of our smoked meats. The right wood can make a good BBQ great.
Common Types of Wood for Smoking
| Wood Type | Flavor Profile | Ideal For |
|---|---|---|
| Hickory | Strong, smoky, slightly sweet | Ribs, pork shoulders, bacon |
| Mesquite | Intense, earthy | Beef, briskets, short ribs |
| Apple | Sweet, fruity | Poultry, pork, ham |
| Cherry | Sweet, mild | Chicken, turkey, vegetables |
| Oak | Medium, versatile | Brisket, sausages, lamb |
| Pecan | Rich, sweet | Turkey, poultry, pork—butt |
-
Hickory: One of the most popular choices, hickory provides a strong, bacon-like smoky flavor. It’s perfect for pork shoulders and ribs.
-
Mesquite: This wood burns hot and fast, with a very intense flavor. It’s excellent for beef, particularly briskets, but can be overwhelming if used too much.
-
Apple: Offering a sweet, fruity aroma, apple wood is ideal for poultry and pork. It provides a mild flavor that enhances, rather than overpowers, the meat.
-
Cherry: Similar to apple but slightly more robust. Cherry wood is versatile and works well with chicken, turkey, and vegetables.
-
Oak: Known for its medium, versatile smoke, oak is reliable for almost any meat. It’s often the go-to wood for beginners because of its balanced flavor.
-
Pecan: A bit milder and sweeter than hickory, pecan is versatile and pairs well with poultry and pork.
Mixing Wood Types
Why limit ourselves to one type of wood? Mixing different woods can add complexity to our smoked meat flavors. For instance, combining hickory and apple wood can give us a balanced smoky and sweet flavor profile.
Preparing the Meat
Let’s talk about the star of the show: the meat. Preparing it properly is just as essential as choosing the right smoker or wood.
Selecting the Meat
Your first decision is to pick the type of meat you want to smoke. Each type has its unique characteristics and requires specific preparations.
Popular Meats for Smoking:
| Meat Type | Characteristics | Suggested Smoking Time |
|---|---|---|
| Brisket | Tough but flavorful | 10-14 hours (225°F) |
| Pork Shoulder | Fatty and forgiving | 8-12 hours (225°F) |
| Ribs | Meaty with rich flavor | 5-6 hours (225°F) |
| Chicken | Tender with a shorter cooking time | 3-5 hours (225°F) |
| Fish | Delicate, requires quick smoking | 1-3 hours (180°F – 200°F) |
-
Brisket: A popular choice that, when done right, is the epitome of smoked meat. Because it’s tough and full of connective tissue, it requires low and slow cooking.
-
Pork Shoulder: A relatively fatty cut, making it forgiving for beginners. Pork shoulder is perfect for pulled pork, with a smoking time of about 8-12 hours.
-
Ribs: These meaty treats usually require around 5-6 hours to smoke. Baby back and spare ribs are popular cuts to start with.
-
Chicken: This might be one of the easiest meats to smoke. It doesn’t need as long, usually around 3-5 hours, so it’s great for those shorter smoking sessions.
-
Fish: Seafood like salmon can be smoked in a much shorter time, usually between 1-3 hours. It’s delicate, so it’s often cold smoked.
Preparing the Meat
Preparation can make or break our final product. Here’s a simple guide on how to prepare different types of meat:
- Trimming: Remove any excess fat. While some fat is beneficial to keep the meat moist, too much can lead to a greasy final product.
- Brining: This is especially useful for poultry. A simple brine can keep our meat juicy and flavorful.
- Rubs and Marinades: These add layers of flavor. Dry rubs are a mix of spices that coat the meat, while marinades are liquid-based and should soak the meat for several hours.
Basic Brine Recipe:
-
Ingredients:
- 1 gallon of water
- 1 cup of kosher salt
- 1/2 cup of sugar
- Various herbs and spices (optional)
-
Instructions:
- Dissolve the salt and sugar in the water.
- Add any additional herbs and spices.
- Submerge the meat and let it sit in the refrigerator for several hours.

This image is property of i5.walmartimages.com.
The Smoking Process
We’re finally at the exciting part: the actual smoking process. This is where the magic happens, transforming raw meat into succulent, flavorful perfection.
Setting Up Your Smoker
Let’s start by setting up the smoker. Here’s a generalized step-by-step process:
- Preheat: Depending on your type of smoker, preheat to the desired temperature (usually around 225°F).
- Add Wood: Place your wood chips, chunks, or pellets onto the heat source. In some cases, you might need to soak the wood chips in water for about 30 minutes beforehand.
- Add Water Pan: Fill the water pan and position it in the smoker.
- Place Drip Pan: Position the drip pan below where the meat will sit to catch the drippings.
- Insert Thermometers: Place one thermometer in the meat and another in the smoker to keep track of the temperature.
Maintaining Temperature
Temperature control is crucial. Frequent temperature spikes can ruin the meat. Here’s how to keep things steady:
- Manual Smokers (Charcoal/Wood): These require more hands-on adjustments. Open or close the vents to control airflow and temperature.
- Electric and Gas Smokers: Typically, these have built-in controls for maintaining a consistent temperature.
Adding the Meat
Once the smoker is set up and the desired temperature is reached, place the meat inside. Ensure the meat isn’t directly over the heat source to allow for even cooking.
Monitor and Maintain
Regularly check the temperature and the wood supply. If the temperature drops, add more wood or adjust the vents. It’s also a good time to mop or spritz the meat with a mixture of water and apple juice to maintain moisture.
The Stall
During smoking, we might experience something called “the stall,” where the meat temperature stalls for a few hours. While it can be frustrating, it’s normal. The solution? Patience. Letting it ride out will result in that tender, juicy meat we’re after.
The Final Touches
Alright, after hours of work, your meat is finally smoked. But wait, there are a few more steps to perfection.
Resting the Meat
Allow the meat to rest for at least 30 minutes after removing it from the smoker. This helps redistribute the juices, ensuring each bite is flavorful.
Slicing
When slicing, go against the grain of the meat. This helps in making each piece tender and easy to chew.
Sauces and Sides
While the meat itself should be the star, some complementary sides and sauces can elevate the whole experience. Think about adding coleslaw, baked beans, cornbread, and a tangy BBQ sauce.

This image is property of Amazon.com.
Troubleshooting Common Issues
No matter how prepared we are, things can sometimes go awry. Here are a few common issues and their solutions:
Meat is Too Dry
- Possible Causes: Overcooking, insufficient water in the pan, or not mopping/spritzing the meat.
- Solutions: Monitor the internal temperature more closely, ensure adequate water in the pan, and regularly mop or spritz the meat.
Bitter Flavor
- Possible Causes: Using too much wood or wood that wasn’t adequately seasoned.
- Solutions: Cut down on the amount of wood used, and ensure you’re using properly seasoned wood.
Tough Texture
- Possible Causes: Cooking at too high a temperature or not allowing the meat to cook long enough.
- Solutions: Maintain a lower, steady temperature and allow sufficient cooking time, particularly for tougher cuts like brisket.
Final Thoughts
Phew! We’ve covered a lot, haven’t we? Smoking meat is a blend of art, science, and a little bit of patience. Starting with the basics and gradually mastering the techniques will reward us with delectable smoked meats that our friends and family will rave about. So let’s get out there and start smoking!
If you venture into smoking meat yourself or have some tips to share, we’d love to hear about your experiences. Feel free to join the Simply Smoked Foods community to share your smokin’ adventures. Let’s make every meal a masterpiece!


